반응형

방법 2. 와일드카드 맵핑

IIS 웹사이트 설정으로 간단하게 해결. IIS 7과 같이 깔끔한 주소로 동작한다.

홈디렉토리 >> 구성 >> 매핑 - 추가

실행파일 : C:\WINDOWS\Microsoft.Net\Framework\v2.0.5072\aspnet_isapi.dll

확장명    : .* (IIS 5 에서는 이렇게 해주고 실행파일쪽 마우스 클릭하면 확인이 활성화 된다...)

동사 - 모든동사, 다음으로 제한 선택 (다음으로제한 : GET, HEAD, POST, DEBUG)

스크립트엔진 선택

파일이 있는지 확인은 선택하지 않는다. (선택시 MVC 어플케이션 동작 안됨)


반응형
반응형

Easy solution for default button

There is a free component that allows you to assign a button to the “enter-pressed” client side event of input controls. If you type some text in textbox and press Enter, the form will postback, and the serverside click event of your button is fired. You don’t need to write any code, but you only need to use this control’s “DefaultButton” property. It you are a beginner programmer this could be a life saver. More about MetaBuilders DefaultButtons Control you can find at http://www.metabuilders.com/Tools/DefaultButtons.aspx

Default buttons in ASP.NET 2.0 and ASP.NET 3.5

ASP.NET 2.0 makes this problems easier and introduce a concept of a “default button”. New defaultbutton attribute can be used with <form> or <asp:panel> control. What button will be “clicked” depends of where actually cursor is and what button is chosen as a default button for form or a panel.

Here is sample HTML code that contains one form and one panel control:

<form defaultbutton=”button1″ runat=”server”>
    <asp:textbox id=”textbox1″ runat=”server”/>
    <asp:textbox id=”textbox2″ runat=”server”/>
    <asp:button id=”button1″ text=”Button1″ runat=”server”/>
    <asp:panel defaultbutton=”button2″ runat=”server”>
        <asp:textbox id=”textbox3″ runat=”server”/>
        <asp:button id=”button2″ runat=”server”/>
    </asp:panel>
</form>

반응형
반응형
 ASP.NET MVC File Upload

This very short blog post will show you how to add support for uploading files to an ASP.NET MVC application.
Add a controller action

Add a controller action that accepts a parameter of type HttpPostedFileBase. In the example below, I save the file to my App_Data folder. I would highly recommend that you redirect the browser to another action when done.

public ActionResult Upload(HttpPostedFileBase file)
{
    var fileName = Path.Combine(Request.MapPath("~/App_Data"), Path.GetFileName(file.FileName));
    file.SaveAs(fileName);
    return RedirectToAction("Index");
}

Add an upload form

Add an upload form. Set the action to your upload controller action, the method to post, and very important, the enctype to multipart/form-data.

<form action="/Home/Upload" method="post" enctype="multipart/form-data">
    <label>Filename: <input type="file" name="file" /></label>
    <input type="submit" value="Submit" />
</form>
반응형
반응형

Let’s check how to work with dropdownlists on ASP.NET MVC web applications.

Basically the object you need to bind an object to a dropdownlist is the SelectList. The following overloads are available:

  • public SelectList(IEnumerable items);
  • public SelectList(IEnumerable items, object selectedValue);
  • public SelectList(IEnumerable items, string dataValueField, string dataTextField);
  • public SelectList(IEnumerable items, string dataValueField, string dataTextField, object selectedValue);

How to…

  • Create a new ASP.NET MVC Web application;
  • Right-click on Controller folder and select Add > Controller;
  • Rename it to CityController and click Add. The controller class is created;
  • Let’s write that is going to be our data source. This method builds a SelectList instance based on a generic list of cities;

public class City
{
    public string Name { get; set; }
    public int ID { get; set; }
}

public static SelectList GetCities(int index)
{
    List<City> cities = new List<City>();

    cities.Add(new City() { ID = 1, Name = “Sao Paulo” });
    cities.Add(new City() { ID = 2, Name = “Toronto” });
    cities.Add(new City() { ID = 3, Name = “New York” });
    cities.Add(new City() { ID = 4, Name = “Tokio” });
    cities.Add(new City() { ID = 5, Name = “Paris” });
    cities.Add(new City() { ID = 6, Name = “Lisbon” });

    SelectList selectList = new SelectList(cities, “ID”, “Name”, index);
    return selectList;
}

  • From the Index action method, let’s add the select list object to the ViewData dictionary and request the view to be rendered;

public ActionResult Index()
{
    ViewData["cities"] = GetCities(1);
    return View();
}

  • Right-click on the method you’ve just coded and select Add View;
  • Create a form using the Html helper method BeginForm and add a dropdownlist and a submit button. Your form will be similar to the following:

<% using (Html.BeginForm()) { %>
<%= Html.DropDownList(“lstCity”, ViewData["Cities"] as SelectList) %>
<input type=”submit” value=”Post” />
<% } %>

  • Build and run the application;
  • Navigating to the url http://localhost/City the view will be loaded with a dropdownlist and a submit button;
  • Let’s create now an action method that will handle the post when the user clicks the post button:

[AcceptVerbs(HttpVerbs.Post)]
public ActionResult Index(FormCollection forms)
{
    int selectedItem = Convert.ToInt32(forms["lstCity"]);
    ViewData["cities"] = GetCities(selectedItem);
    return View();
}

Selecting a city on the dropdownlist and clicking on post button will raise a request that reaches the Index action method overload on CityController class that accepts a HttpVerb equals Post. In our simple example, the integer variable stores the id of the selected value on the form.

That is the simplest way to load and get the selected value of the dropdownlist.

반응형
반응형

일반적으로 웹 프로그램을 개발시 DB연동과 관련된 Connection 정보를 소홀하게 관리하는 경우가 많이 있다.

MS의 ASP.NET에서는 이러한 중요한 정보를 암호화할 수 있도록 설정하여 응용 프로그램의 보안을 향상시킨수 있는 방법을 제공해준다. aspnet_regiis.exe를 사용하여 web.config파일의 특정 섹션을 암호화하고 암호화 키를 관리할 수 있다

* 사전 요구 사항
해당 내용에 대한 설정을 완료하기 위해서는 다음과 같은 요건을 갖춰야 한다.


  • 사이트를 호스팅하는 컴퓨터에 Microsoft IIS(인터넷 정보 서비스)가 설치 및 구성되어 있어야 한다.
  • ASP.NET 웹 사이트

* Web.config의 <connectionStrings> 자식 요소 및 <machineKey> 자식 요소 암호화 방법

  1. 텍스트 편집기에서 응용 프로그램에 대한 Web.config 파일을 엽니다.

    • ASP.NET 응용 프로그램에 대한 Web.config 파일이 없으면 텍스트 편집기를 열고 예제 구성을 새 파일로 복사한 다음 새 파일을 ASP.NET 응용 프로그램 디렉터리에 web.config로 저장합니다.

  2. 다음 예제와 같이 <system.web> 요소에 대한 <connectionStrings> 자식 요소와 <machineKey> 자식 요소가 모두 있어야 합니다.

    <configuration>
       <connectionStrings>
          <add name="SqlServices" connectionString="Data Source=localhost;Integrated Security=SSPI;Initial Catalog=Northwind;" />
       </connectionStrings>

       <system.web>

         <machineKey validationKey="D61B3C89CB33A2F1422FF158AFF7320E8DB8CB5CDA1742572A487D94018787EF42682B202B746511891C1BAF47F8D25C07F6C39A104696DB51F17C529AD3CABE"
           decryptionKey="FBF50941F22D6A3B229EA593F24C41203DA6837F1122EF17" />

       </system.web>
    </configuration>
     
  3. Web.config 파일을 닫습니다.

  4. 명령 프롬프트에서 다음 명령을 입력하여 디렉터리를 .NET Framework 버전 2.0 디렉터리로 변경합니다.

    cd \WINDOWS\Microsoft.Net\Framework\v2.0.*

    1. 명령 프롬프트에서 다음 옵션을 사용하여 aspnet_regiis.exe를 실행합니다.
    2. -pe 옵션과 "connectionStrings" 문자열을 사용하여 응용 프로그램에 대한 Web.config 파일의 connectionStrings 요소를 암호화합니다.

    • -app 옵션과 응용 프로그램의 이름을 사용합니다.

    1. 예를 들어 다음 명령은 MyApplication이라는 응용 프로그램에 대한 Web.config 파일의 <connectionStrings> 섹션을 암호화합니다.
    2. aspnet_regiis -pe "connectionStrings" -app "/MyApplication"
    3. 다음 예제와 같이 <system.web> 요소의 <machineKey> 자식 요소에 대해 이전 단계를 반복합니다.

      aspnet_regiis -pe "system.web/machineKey" -app "/MyApplication"

      명령 프롬프트 창을 닫지 마십시오.

    4. Web.config를 열고 암호화된 내용을 확인합니다.

      다음 예제의 Web.config 파일과 비슷한 내용이 표시될 것입니다.

    <configuration>

       <connectionStrings configProtectionProvider="RsaProtectedConfigurationProvider">
          <EncryptedData Type="http://www.w3.org/2001/04/xmlenc#Element"
             xmlns="http://www.w3.org/2001/04/xmlenc#">
             <EncryptionMethod Algorithm="http://www.w3.org/2001/04/xmlenc#tripledes-cbc" />
             <KeyInfo xmlns="http://www.w3.org/2000/09/xmldsig#">
                <EncryptedKey xmlns="http://www.w3.org/2001/04/xmlenc#">
                   <EncryptionMethod Algorithm="http://www.w3.org/2001/04/xmlenc#rsa-1_5" />
                   <KeyInfo xmlns="http://www.w3.org/2000/09/xmldsig#">
                      <KeyName>RSA Key
                      </KeyName>
                   </KeyInfo>
                   <CipherData>
                      <CipherValue>WcFEbDX8VyLfAsVK8g6hZVAG1674ZFc1kWH0BoazgOwdBfinhcAmQmnIn0oHtZ5tO2EXGl+dyh10giEmO9NemH4YZk+iMIln+ItcEay9CGWMXSen9UQLpcQHQqMJErZiPK4qPZaRWwqckLqriCl9X8x9OE7jKIsO2Ibapwj+1Jo=
                      </CipherValue>
                   </CipherData>
                </EncryptedKey>
             </KeyInfo>
             <CipherData>
                <CipherValue>OpWQgQbq2wBZEGYAeV8WF82yz6q5WNFIj3rcuQ8gT0MP97aO9SHIZWwNggSEi2Ywi4oMaHX9p0NaJXG76aoMR9L/WasAxEwzQz3fexFgFSrGPful/5txSPTAGcqUb1PEBVlB9CA71UXIGVCPTiwF7zYDu8sSHhWa0fNXqVHHdLQYy1DfhXS3cO61vW5e/KYmKOGA4mjqT0VZaXgb9tVeGBDhjPh5ZlrLMNfYSozeJ+m2Lsm7hnF6VvFm3fFMXa6+h0JTHeCXBdmzg/vQb0u3oejSGzB4ly+V9O0T4Yxkwn9KVDW58PHOeRT2//3iZfJfWV2NZ4e6vj4Byjf81o3JVNgRjmm9hr9blVbbT3Q8/j5zJ+TElCn6zPHvnuB70iG2KPJXqAj2GBzBk6cHq+WNebOQNWIb7dTPumuZK0yW1XDZ5gkfBuqgn8hmosTE7mCvieP9rgATf6qgLgdA6zYyVV6WDjo1qbCV807lczxa3bF5KzKaVUSq5FS1SpdZKAE6/kkr0Ps++CE=
                </CipherValue>
             </CipherData>
          </EncryptedData>
       </connectionStrings>

       <system.web>
         <machineKey configProtectionProvider="RsaProtectedConfigurationProvider">
           <EncryptedData Type="http://www.w3.org/2001/04/xmlenc#Element"
             xmlns="http://www.w3.org/2001/04/xmlenc#">
             <EncryptionMethod Algorithm="http://www.w3.org/2001/04/xmlenc#tripledes-cbc" />
             <KeyInfo xmlns="http://www.w3.org/2000/09/xmldsig#">
               <EncryptedKey xmlns="http://www.w3.org/2001/04/xmlenc#">
                 <EncryptionMethod Algorithm="http://www.w3.org/2001/04/xmlenc#rsa-1_5" />
                 <KeyInfo xmlns="http://www.w3.org/2000/09/xmldsig#">
                   <KeyName>RSA Key
                   </KeyName>
                 </KeyInfo>
                 <CipherData>
                   <CipherValue>IwUopItbWX0mJdGWtAqE1LlsG3u5RBRlAXs9/GZj3HEfeUXduHVF76q6Ip88YqlfLthH+DMBYdOZAF+hCOmS2agfTo1tKUvELRGIljS/BqEYxUO+/IOz9tllAw8ZlGF7AVCzptgIejI+iLXEZfMKW7f6EMGeb5vaaKXHIkYZwcM=
                   </CipherValue>
                 </CipherData>
               </EncryptedKey>
             </KeyInfo>
             <CipherData>
               <CipherValue>ivVyERVPNUzIb/i7/NUbRkxsxh8IG959vycwrzJO0vYWxHZ5i03SfrLbsGUV17+FxZ6lbcrVaF5FY3zVm7dRMRvQpVFwaVcL
               </CipherValue>
             </CipherData>
           </EncryptedData>
         </machineKey>

       </system.web>
    </configuration>

    *  Web.config의 <connectionStrings> 자식 요소 및 <machineKey> 자식 요소 복호화 방법

    필요한 경우 -pd 옵션으로 aspnet_regiis.exe를 실행하여 암호화된 Web.config 파일 내용을 해독할 수 있습니다. 암호 해독 구문은 -pe 옵션으로 Web.config 파일 내용을 암호화할 때와 동일하지만 보호되는 구성 공급자를 지정하지 않는다는 점이 다릅니다. 해당 공급자는 protected 섹션의 configProtectionProvider 요소로 식별됩니다. 예를 들어 다음 명령은 MyApplication이라는 ASP.NET 응용 프로그램에 대한 Web.config 파일에서 <connectionStrings> 요소 및 <system.web> 요소의 <machineKey> 자식 요소를 해독합니다.

    aspnet_regiis -pd "connectionStrings" -app "/MyApplication"

    aspnet_regiis -pd "system.web/machineKey" -app "/MyApplication"

    - 출처 : MSDN

    반응형
    반응형

    1. IE Developer Toolbar

    http://www.microsoft.com/downloads/details.aspx?familyid=E59C3964-672D-4511-BB3E-2D5E1DB91038&displaylang=en


    웹 개발할때 유용한 도구이다. Microsoft에서 제공하는 무료 툴 이다.

    특히 태그 정보를 확인 하고 싶을때 클릭 만으로 확인할 수 있어서 좋다.

    스타일 쉬트 정보도 함께 나오기 때문에 해당 엘리먼트에 어떤 스타일이 적용되었는지 확인하기 쉽다.

    IE에 Addin 형식으로 포함되기 때문에 편하게 실행시킬 수 있다.

    아래는 정보 요약이다.

    • Explore and modify the document object model (DOM) of a Web page.
    • Locate and select specific elements on a Web page through a variety of techniques.
    • Selectively disable Internet Explorer settings.
    • View HTML object class names, ID's, and details such as link paths, tab index values, and access keys.
    • Outline tables, table cells, images, or selected tags.
    • Validate HTML, CSS, WAI, and RSS web feed links.
    • Display image dimensions, file sizes, path information, and alternate (ALT) text.
    • Immediately resize the browser window to a new resolution.
    • Selectively clear the browser cache and saved cookies. Choose from all objects or those associated with a given domain.
    • Display a fully featured design ruler to help accurately align and measure objects on your pages.
    • Find the style rules used to set specific style values on an element.
    • View the formatted and syntax colored source of HTML and CSS.


    2. Fiddler

    http://www.fiddler2.com/fiddler2/


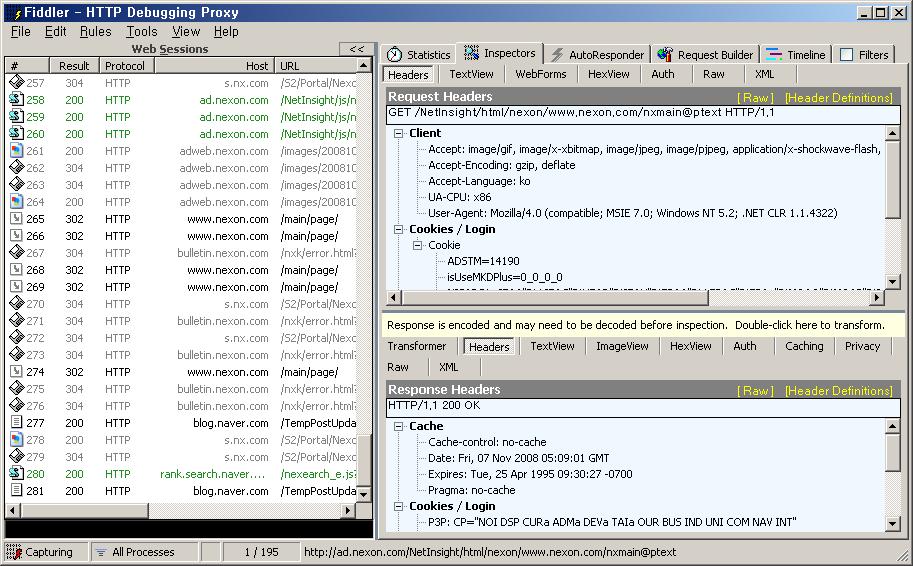
    무료툴이다. IE에 애드인이 되는 형식은 아니고 실행 시켜 놓으면 실시간으로 정보를 수집한다.

    이 툴의 장점은 디버깅이 된다는 것이다. 또한 태그 값을 조작할 수도 있다.

    단, 닷넷 프레임웍 2.0이 있어야 한다.


    Fiddler is a Web Debugging Proxy which logs all HTTP(S) traffic between your computer and the Internet. Fiddler allows you to inspect all HTTP(S) traffic, set breakpoints, and "fiddle" with incoming or outgoing data. Fiddler includes a powerful event-based scripting subsystem, and can be extended using any .NET language.


    3. IE Watch

    http://www.iewatch.com/

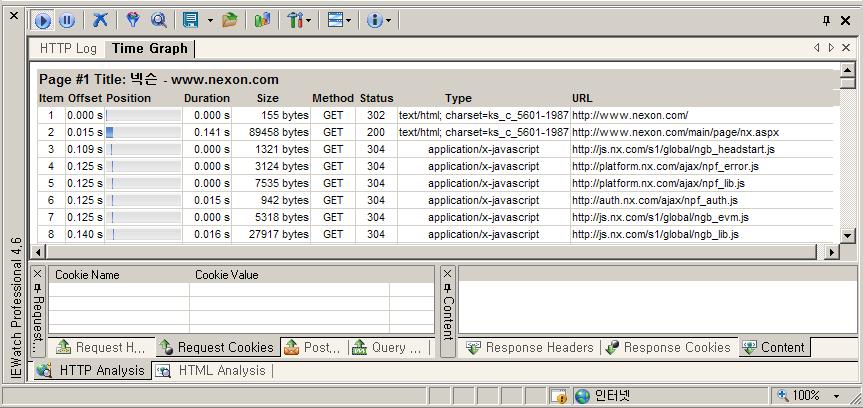
    IE에 애드인 되어서 동작하는 성능분석 툴이다.

    트래픽을 그래프로 표현해 주기 때문에 어디에서 부하가 걸리는지 쉽게 파악할 수 있다.

    단, 유료이므로 구매를 해야 한다. 무료로 30일은 사용이 가능하다.


    4. IBM Page Detailer

    http://alphaworks.ibm.com/tech/pagedetailer


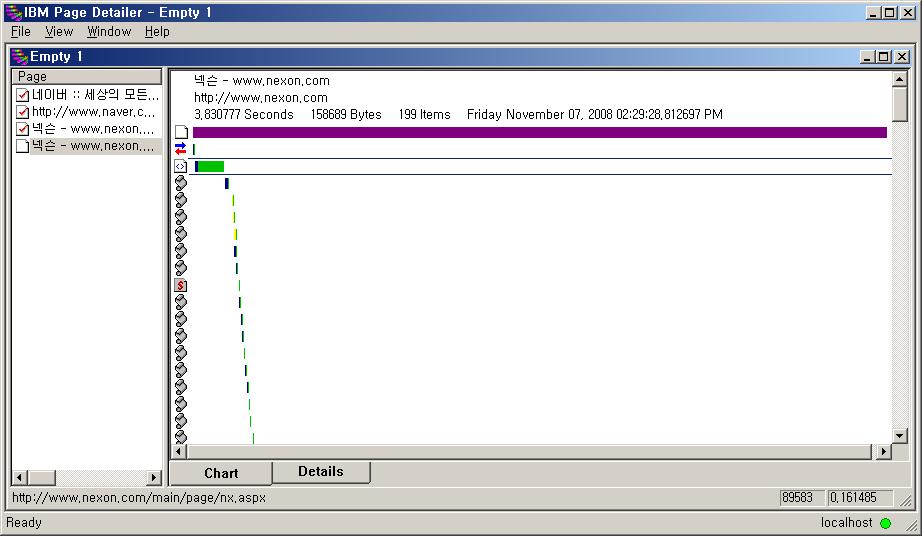
    IE Watch와 같은 성능분석 툴. 이것은 무료다.

    다만 IE Watch 비해서는 기능이 단순하다.


    IBM Page Detailer is a graphical tool that enables Web site developers and editors to rapidly and accurately assess performance from the client's perspective. IBM Page Detailer provides details about the manner in which Web pages are delivered to Web browsers. These details include the timing, size, and identity of each item in a page. This information can help Web developers, designers, site operators, and IT specialists to isolate problems and improve performance and user satisfaction.


    반응형
    반응형

    닷넷 내에서 데이터 다운로드 기능을 구축할때

    a 링크를 통해서 많이들 적용시켜놓는데

    보안성, 효율성 면에서 아주~~~~~ 떨어지는 방법이다.

    다운로드 기능은 많이 사용하지 않아서 한번 쓰고 잊고 해서

    항상 구글신을 통해서 기술을 습득하곤 했다.

    아래의 링크는 MS에서 파일 다운로드 구축에 따른 article이다.

    자세히 읽어보면 파일 다운로드에 대한 기본적인 이해를 시켜줄 수 있을것이다.^^

    http://www.microsoft.com/korea/msdn/msdnmag/issues/06/09/WebDownloads/default.aspx#S1
    반응형
    반응형

    .NET Framework 란?

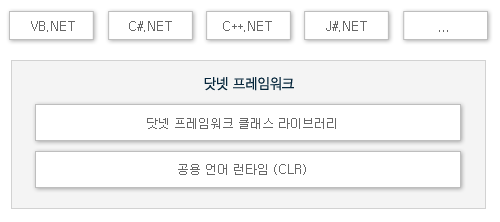
    닷넷 프레임워크는 크게 두 가지로 나눌 수 있는데, 프로그램을 개발할 때 필요한 서비스 집합과 프로그램 실행 환경으로 구성되며, 닷넷 프레임워크에 기반한 개발언어에는 C#.NET, VB.ENT, C++.NET, J#.NET 등이 있습니다.

    사용자 삽입 이미지

    < 닷넷 프레임워크 구성도 >


    .NET Framework 구성 요소


    < 닷넷 프레임워크 구성 요소 >


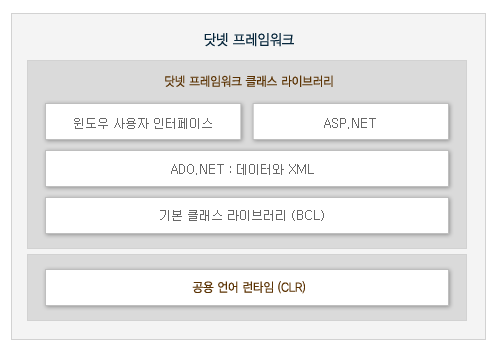
    닷넷 프레임워크는 크게 "공용 언어 런타임(Common Language Runtime, CLR)"과 "닷넷 프레임워크 클래스 라이브러리"로 나눌 수 있습니다.
    CLR은 닷넷을 사용할 때 여러 언어를 사용할 수 있게 해주는 기술로서, 프로그래머를 대신해서 닷넷 형식(Type)들의 위치를 지정하고, 이 형식들을 로드하고 관리하는 역할을 합니다.

    닷넷 프레임워크 클래스 라이브러리는 애플리케이션을 개발할 때 필요한 기능들의 묶음으로, 필요한 기능을 개발자가 일일이 만들지 않아도 이미 만들어진 클래스 라이브러리를 사용해서 구현할 수 있게 한 것입니다. 클래스 라이브러리는 기본 클래스 라이브러리(BCL, Basic Class Libray)와 윈도우 사용자 인터페이스, ASP.NET, ADO.NET으로 나눌 수 있습니다.

    • 기본 클래스 라이브러리(BCL) : 클래스 라이브러리 중 가장 핵심적인 기능을 하는 클래스 모음
    • 윈도우 사용자 인터페이스 : 닷넷 언어로 윈도우 프로그램을 만들 때 지원하는 클래스
    • ASP.NET :  닷넷 언어로 웹 프로그래밍을 할 때 지원하는 클래스
    • ADO.NET : 데이터베이스를 사용할 때 지원하는 클래스

     공용 언어 런타임(CLR)
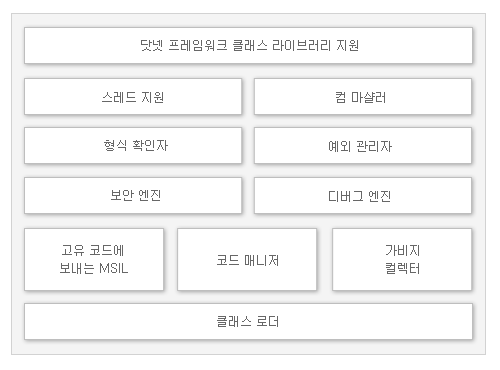
    <공용 언어 런타임(CLR) 구성 >


    CLR을 성명하기 전에 먼저, 고유 코드에 대해서 이해할 필요가 있습니다.

    고유 코드(Native Code)란 윈도우 같은 운영체제에서 직접 해석하 수 있는 코드로서 원시 코드라고도 부릅니다. 그렇지만 일반적인 프로그래밍 언어는 개발의 편의를 위해서 사람이 읽고 해석할 수 있도록 작성하기 대문에 이 자체로는 운영체제에서 해석할 수 없습니다. 따라서 컴파일(compile)이라는 과정을 통해서 운영체제에서 해석하 수 있도록 고유 코드로 변환해줘야 합니다.

    따라서 CLR도 닷넷 언어로 만들어진 코드를 읽고 해석한 후, 운영체제에서 해석할 수 있게 컴파일 해주는 일종의 가상머신(Virtual Machine)아라고 이해하면 쉽습니다.

    그렇지만 VB.NET, C#등과 같은 닷넷 언어는 윈도우 등 운엉체제의 고유 코드로 바로 컴파일 되지 않고, 마이크로소프트 중간 언어 (MSII, MicroSoft Intermediate Language)로 컴파일 됩니다. 따라서 운영체제에서 닷넷 애플리케이션을 바로 실행할 수 없는데, 닷넷 애플리케이션을 실행하려면 닷넷 프레임워크의 CLR에 있는 JIT(Just-In-Time) 컴파일러를 통해서 MSIL 코드를 고유 코드로 변환한 후 실행해야 합니다.

    결국, CLR과 JIT 컴파일러를 통해 MSIL 코드를 고유코드(실행 가능한 코드)로 변환하는 역할을 합니다.

    사용자 삽입 이미지

    < 공용 언어 런타임(CLR)의 역할 >


    그렇다면 왜 닷넷에서는 닷넷 코드를 바로 실행 가능한 코드로 컴파일하지 않고 MSIL을 만들까요? MSIL을 사용하는 이유는 닷넷 언어가 C# 뿐만 아니라 VB.NET, J#.NET, C++.NET 등 개발 언어가 다양하기 때문에 이를 통합적으로 해석한 후에 고유 코드를 만들기 위해서 입니다.

    MSIL은 프로그램을 한번 만들어 놓으면 그것이 어느 플랫폼에서 만들어졌는지에 상과없이 자신의 플랫폼에서 사용할 수 있게 해줍니다. 그래서 닷넷이 다중 플랫폼을 지원할 수 있는 것입니다.

    VB.NET, C#, C++.NET 등으로 만든 프로그램을 MSIL로 컴파일하면 exe, dll 파일 등으로 만들어져 보관했다가, 실행될 CPU와 운영체제가 결정되면 그에 맞는 JIT 컴파일러를 통해 실행 코드가 생성되어 사용되는 것입니다.


     기본 클래스 라이브러리(BCL)

    BCL은 닷넷 언어를 이용해서 쉽게 개발할 수 있도록 기존 마이크로소프트의 다양한 개발 라이브러리를 닷넷에서 사용할 수 있게 통합해 놓은 기본적인 클래스 라이브러리의 모음입니다. 이러한 BCL은 네임스페이스를 사용해서 논리적으로 그룹화되어 있습니다.

    BCL은 모든 닷넷 기반 애플리케이션과 컴포넌트에서 공통으로 자주 사용하는 System, System.Collections, System.Diagnostics 등과 같은 네임스페이스를 포함하고 있습니다. 또한 네트워크 연결, 프로토콜 구현, 파일과 스트림 입출력 클래스, 멀티스레딩, 텍스트 처리, 정규 표현식(Regular Expression) 그리고 리플렉션(Reflection) 등의 기능도 함께 포함하고 있습니다.


     ADO.NET : 데이터와 XML

    ADO.NET은 닷넷 프레임워크의 일부로 System.Data 네임스페이스와 하위 네임스페이스에서 제공하는 데이터 접근 기술입니다. ADO.NET은 인터넷이나 인트라넷과 같은 비연결 기반 프로그래밍 모델을 제공하는데, 다음과 같이 구성됩니다.

    • System.Data 네임스페이스
      ADO.NET 객체 모델을 구성하는 클래스로 이뤄져 있습니다. ADO.NET 객체 모델은 크게 연결 기반 계층과 비연결 기반 계층으로 나눠져 있기 때문에 개발하고자 하는 형태의 애플리케이션 아키덱처에도 적합하게 사용할 수 있습니다.
    • System.Xml 네임스페이스
      W3C 호환 XML 작성기(XML Writer), 그리고 XSLT와 XPath 등 많은 XML 관련 기술을 위한 클래스로 이뤄져 있습니다.

     윈도우 사용자 인터페이스

    윈도우 폼(Window Form)은 닷넷 프레임워크 기반의 윈도우 애플리케이션을 개발하기 위한 새로운 플랫폼입니다.

    특히 윈폼은 풍부한 사용자 인터페이스를 포함하는 윈도우 애플리케이션을 개발하기 위해서, 명료하고 객체지향적이며 확장 가능한 클래스의 집합으로 구성되어 있습니다. 또한 분산 계층(Multi-Tier) 솔루션에서 로컬 사용자 인터페이스로 활용될 수도 있습니다.

    윈폼 생성에 관련된 클래스는 System.Window.Form 네임스페이스에 포함되어 있으며, 윈폼 유형은 크게 표준 윈도우, MDI 윈도우, 대화상자로 나눌 수 있습니다.


     ASP.NET

    ASP.NET은 강력한 웹 애플리케이션을 개발하기 위한 프로그래밍 프레임워크입니다. 그리고 ASP.NET 웹폼(Web Forms)은 쉬우면서도 강력한 방법으로 웹 사용자 인터페이스 페이지를 생성할 수 있게 하며, ASP.NET 웹서비스는 분산 웹 기반 애플리케이션 생성을 위한 빌딩 블록(Building Block)을 제공합니다.

    • System.Web 네임스페이스
      웹 서비스와 웹 사용자 인터페이스 모두에 공통으로 사용될 수 있는 캐싱, 보안, 애플리케이션 환경 설정 등과 같은 하위 단계 서비스를 위한 클래스를 제공합니다.
    • System.Web.Services 네임스페이스
      프로토콜 등과 같은 웹 서비스를 핸들링하기 위한 클래스를 제공합니다.
    • System.Web.UI 네임스페이스
      웹 페이지나 컨트롤과 같이 사용자 인터페이스의 컨트롤에 대한 클래스를 제공합니다.

    ASP.NET에서의 컨트롤은 크게 System.Web.UI.HtmlControls 네임스페이스에서 제공하는 HTML 태그와 직접 매핑되는 HTML 컨트롤, System.Web.UI.WebControls 네임스페이스에서 제공하는 강력한 웹 컨트롤로 나눌 수 있습니다.

    반응형

    + Recent posts